


Microsoft Excel is the premiere spreadsheet program for number crunchers everywhere. But did you know you could also use Excel as a database? It’s all a matter of tables, and it gives Excel some of the database power of Access, Microsoft’s dedicated database program.
How a Database Differs from a Spreadsheet
A spreadsheet program, such as Excel, is used to manage and manipulate data of various types. A database program, such as Access, is also used to manage and manipulate data of various types. What’s the difference between the two?
Perhaps the biggest difference between a spreadsheet and a database is in the way that data organized. A spreadsheet stores its data in the traditional row-and-column grid, whereas a database structures its data into individual records, each of which contains the same data fields. Think of a database as the digital equivalent of a filing cabinet filled with index cards. Each record in a database corresponds to an index card; in each record (or on each card) are the fields of detailed information.
A database structure makes it easy to add new data, merely by appending new records to the database. Each new record maintains the same data structure (that is, the same fields) as the previous records. It’s just like adding a new index card to the filing cabinet.
This structure also makes it easy to query a database. Just filter or sort by individual fields and you get the answers to whatever questions you may have.
Spreadsheets are not quite as structured as databases, which has pros and cons. On the plus side, a spreadsheet is easier to set up and use than a database. On the minus side, spreadsheets aren’t nearly as good at dealing with massive amounts of data; too many rows and columns quickly become cumbersome.
Using a Table as a Database
This doesn’t mean that you can’t use a spreadsheet as a database. In fact, Excel offers database functionality in the form of tables. When you set up your spreadsheet data in the right format, you can convert a range of cells into a table. An Excel table provides database-like functionality within the familiar confines of the spreadsheet format.
What do you get when you use an Excel table? A table enables you to filter and sort the data in a variety of ways not possible in a normal spreadsheet; you can display only those fields that match a given criteria, and in the order you want. In addition, whenever you add new data to a table, the table automatically expands; you don’t have to reselect the new range. And finally, any charts referencing the table are also automatically updated when you add new data to the table.
It’s like working with a database but within a spreadsheet.
Creating a Table
To use Excel’s table function, the data in your spreadsheet must be properly organized. It’s a matter of what you put in your rows and what you put in your columns.
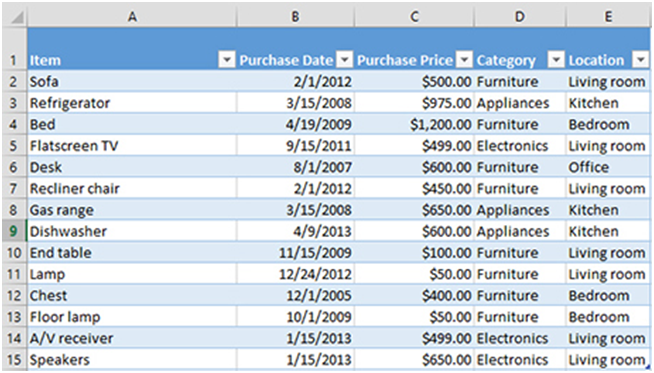
The first thing you need to do is to use rows for records (one row per record) and columns for fields. For example, if you’re creating a home inventory, each row should be an individual item in your house. Use columns for fields such as purchase date, purchase price, type of item, location, and the like. And make sure the first row of the table range contains the field names.
Once you’ve entered your data in the proper format, you can then convert that range of cells into an Excel table. Just select the entire range of data, select the Home tab on the Ribbon, go to the Styles section, and click the Format as Table button.
This displays the table styles gallery; click the visual style you want for your table. You now see the Format as Table dialog box. Check the My Table Has Headers option, then click OK. The range you selected is now formatted as a table, complete with pull-down headers for each column.
Working with Table Data
One of the advantages of working with a database is the ease to which individual records can be added or deleted. This is also the case with an Excel table.
If you want to insert new records into your table, you have two options. You can simply enter data into the row directly beneath the last row of the table in your spreadsheet; Excel automatically adds this new record to the table. You can also add a record using a data form, much as you would in a traditional database. To do this, you’ll need to manually add the Form button to Excel’s Quick Access toolbar. Once added, click the Form button to display a data form for this table; click the New button to display a blank form, enter the appropriate field data, and then click Close when done.
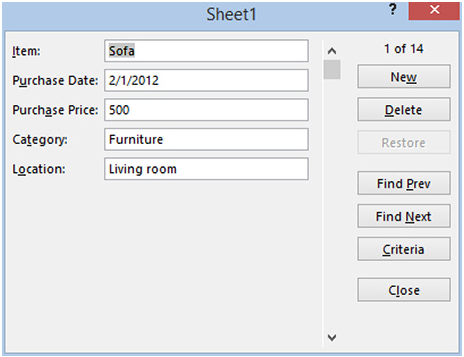
Deleting records is just as easy. The quickest approach is to simply delete a row from the table itself. You can also click the Form button to display the data from the window, move to the record you want to delete, and then click the Delete button.
To sort the data in your table by a given field, click the pull-down header for that column and then select how you want to sort—A to Z, Z to A, Smallest to Largest, or Largest to Smallest. The records (rows) of the data are now sorted by the column you selected. For example, if you want to sort your home inventory table by cost, click that column header and select Smallest to Largest.
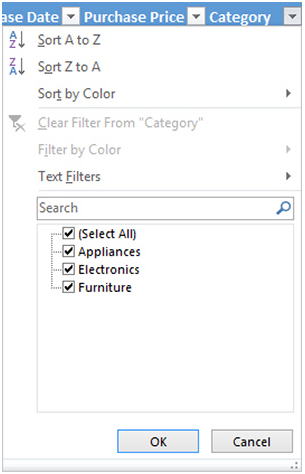
To filter the data in your table, so that only selected records are displayed, you again click the pull-down header for the column by which you want to filter. By default, all the values for this field are displayed and checked; uncheck those values you don’t want to be displayed. For example, if you only want to see furniture items in your home inventory table, click the appropriate column header and uncheck all the other options except “furniture.”
You can also add total rows to your table, to quickly sum up numerical values. Just select the Design tab in the Ribbon, go to the Table Style Options section, and check the Total Row option. This inserts a total row at the bottom of the table. Position the cursor in the Total row cell for the column you wish to total, click the down-arrow, and select Sum. The Total row now contains a value for the sum of the selected column.
Now that you know how to sort your data into tables, you can turn your Excel spreadsheets into a database.


")

